How to transform a problematic room into a reliable mixing studio
- Escrito por Román Vega
- Publicado en ENGLISH
The acoustic treatment of a studio is often the most neglected link, even in professional environments. Investments are made in high-end monitors, premium interfaces, and top-notch converters, yet the room itself—the first link in the listening chain—is frequently overlooked.
This article documents a real case of acoustic intervention in a professional studio located in a medium-sized room, with one clear objective: to achieve a controlled, reliable, and as neutral as possible response across the entire frequency spectrum, without relying on digital corrections that alter the signal.
Technical description of the room
- - Dimensions: 5.60 m (width) x 4.08 m (length) x 2.00 m (height).
- - Structure: stippled walls on three sides, rear featuring built-in wooden cabinets, flat ceiling.
- - Floor: ceramic (high level of reflection).
- - Velux-type windows on the sloping lateral wall (right side), creating asymmetry.
- - Listening position off-center (1 m from the right wall), potentially causing differences in lateral reflections.
- - Furniture: central Sessiondesk table, rear sofa, three small rugs.
The environment was initially untreated acoustically, aside from the aforementioned elements.
Methodology and measurement equipment
- - Measurement software: Room EQ Wizard (REW)
- - Microphone: calibrated XLR (considered superior to USB for its reliability, low noise, and compatibility with professional interfaces).
- - Interface: Universal Audio Apollo x6 (using high-quality conversion and stable gain).
- - Reference headphones: Audeze LCD-X (for direct comparison with listening outside the room).
The following acoustic measurements were taken from the listening position, averaging three takes to minimize errors and ensure reliability:
What do the graphs included in this analysis measure?
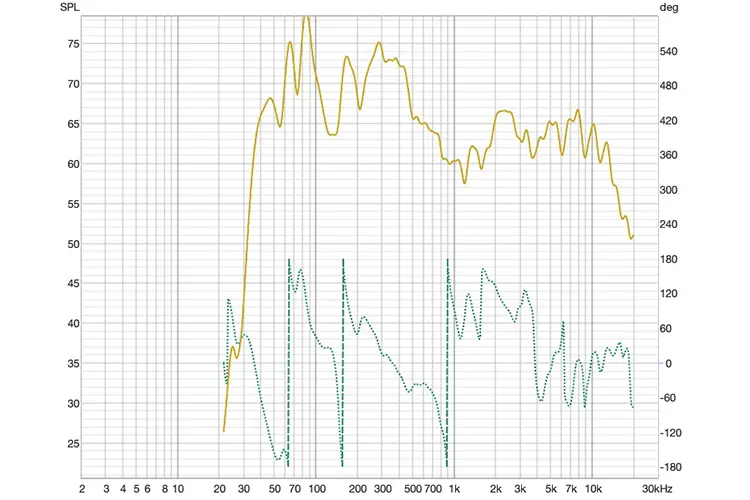
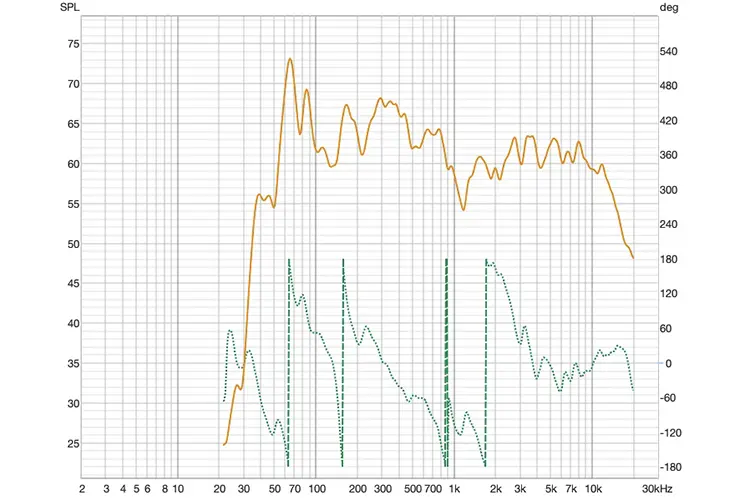
- - SPL (Sound Pressure Level): Represents the frequency response of the room—that is, how the sound pressure levels vary at different frequencies when sound is played in the space. It allows visualization of excesses, peaks, dips, and coloration that alter the true perception of the audio. An ideal curve should be relatively flat.
 |
 |
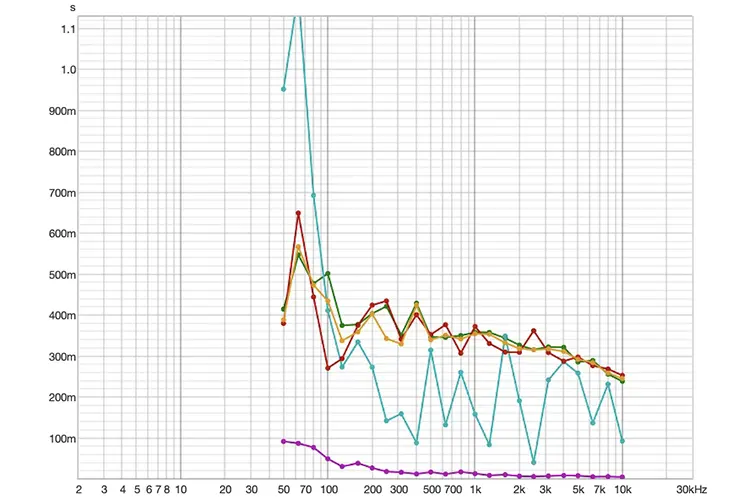
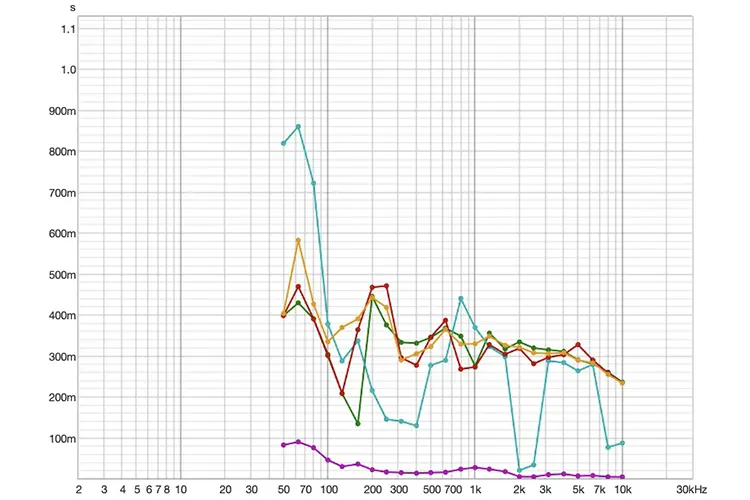
- - RT60 (Reverberation Time): Measures the time it takes for the sound to drop 60 dB from its peak after the source stops. It is key to evaluating how a room responds at different frequencies, and whether it retains energy (reverberation) more than desired, affecting clarity—especially in the bass. Ideally, the RT60 in a small studio should be maintained between 200 and 400 ms, being shorter in the highs and controlled in the lows.
 |
 |
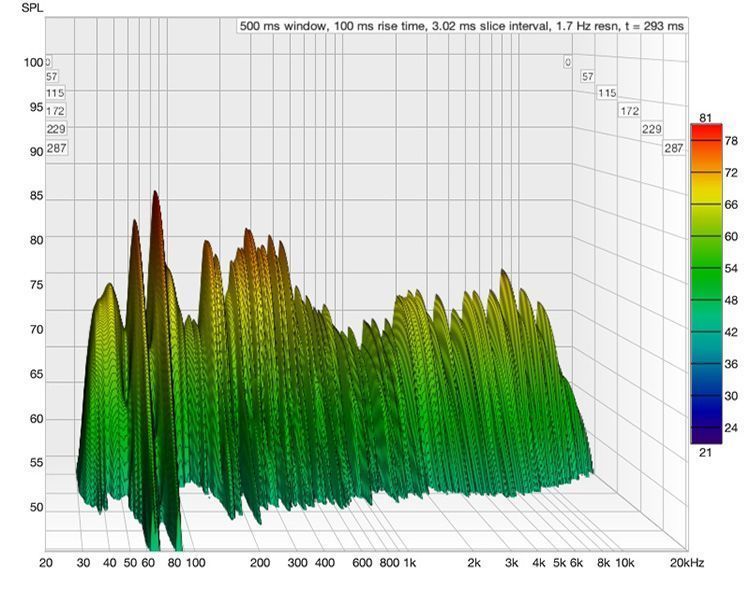
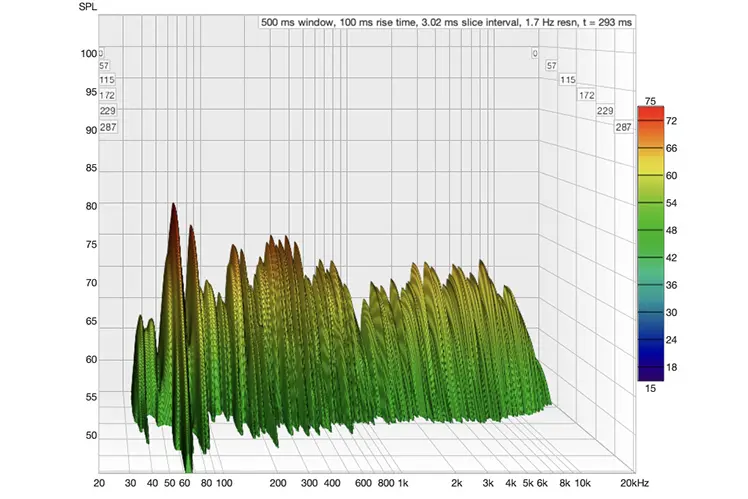
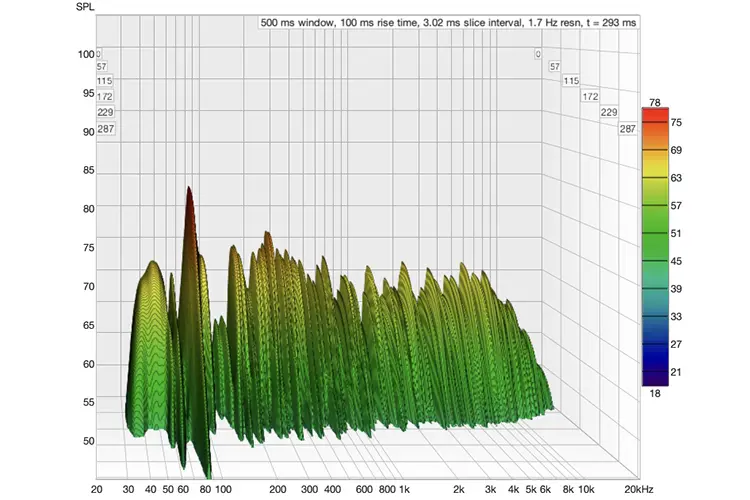
- - Waterfall (Spectral Persistence Graph): Represents how frequencies persist over time within the room. It combines the axes of frequency, level, and time, displaying resonant tails or accumulations that remain after the sound stops. This is especially useful for identifying difficult resonances in low frequencies (room modes).
 |
 |
- - Clarity (C50 / C80): Evaluates the percentage of direct energy versus reflected energy within a specified time range (50 ms for voice / 80 ms for music). Values above 80% indicate an acoustically clear environment, where direct sound predominates and enhances stereo perception and definition.
Analysis of results: detected issues
- - Clear peak at 50-60 Hz: RT60 over 700 ms, indicative of uncontrolled resonance.
- - Excessive RT60 between 63-100 Hz: values above 500 ms.
- - Mild to moderate resonances between 120 and 250 Hz and slight tails between 1 kHz and 2 kHz.
- - Lateral symmetry issues: expected due to the desk position, though not critical in the measurement.
- - Early lateral and ceiling reflections without treatment.
Correction strategy: applied acoustic treatment
- Cylindrical bass traps (Vicoustic Vari Bass Ultra): Placed in the rear corners of the room, tuned to their maximum frequency (60 Hz) using the adjustable resonance system. They proved effective in the critical 50-60 Hz range.
- Front bass traps Vicoustic Super Bass Extreme: Placed in corners A and D, providing active absorption from 60 Hz.
- Vicoustic Cinema Piano VMT absorbent panels (White/White): Placed behind the monitors to control early reflections and initial midrange response.
- Vicoustic Wavewood Ultra Lite diffuser/absorbent panels: Installed on the rear wall and ceiling, offering simultaneous control and diffusion in the mid-high frequencies without deadening the room.
- Rugs and repositioning of the rear sofa to avoid unwanted absorption and prevent interference with the bass traps' effectiveness.
Post-intervention results
- - RT60 in 50-60 Hz dropped from 700 ms to 420 ms, a drastic improvement in that range.
- - Progressive improvement from 63 to 100 Hz: an additional reduction of 100-150 ms.
- - More uniform response up to 250 Hz, with less coloration.
- - Reduction of early reflections and improvement in clarity (Clarity > 80% in 1-2 kHz).
- - Subjective impression of greater control and stereo depth.
Conclusions and recommendations
- - Measurement is essential: without objective data, it is impossible to know where to act.
- - RT60 in the bass is the greatest enemy and the most difficult to control: effective physical traps are required.
- - Avoid DIY solutions or decorative foam panels that do not operate below 250 Hz.
- - Use combinations of absorption and diffusion according to the area (ceiling and rear versus front).
- - Take measurements before and after to validate each decision.
Is there a digital way to control all of this without panels or traps?
Not really. Although digital correction tools such as Sonarworks, ARC, or Dirac Live exist, they only act on the signal sent to the monitors and do not modify the room’s actual response. In other words, they do not eliminate resonances, early reflections, or correct an elevated RT60. Instead, they partially compensate for some frequency response issues by introducing inverse equalization and, in some cases, slight time correction.
These solutions may help in home environments or non-critical editing scenarios, but in a professional studio they are clearly insufficient and, in some cases, even counterproductive, as they add coloration, latency, or phase modification. The only real way to control a room’s acoustics is through physical treatment: absorption, diffusion, and geometric control.
Although in the second chapter we will address how the excess frequencies were resolved and more alternatives for their treatment. This project has demonstrated that a room with severe resonance and reflection issues can be transformed into a reliable mixing environment without resorting to digital solutions or artificial corrections. Knowledge, measurement, and an appropriate choice of treatment have been key.